LESSON 3
Power Start & Controlled Stop
Goals
- Cyclist can demonstrate a Power Start position (pedal lined up with downtube, other foot flat on the ground, right hand squeezing rear brake).
- Cyclist can demonstrate the ability to control braking and come to a complete stop safely. Cyclist understands the difference between rear and front brakes (80/20% usage)
Overview
This lesson teaches students how to start riding a bicycle in a strong, controlled manner and prevent hesitation and wobbling. This skill can be a challenging for new cyclists until they become comfortable standing on the pedals.
Almost as important as being able to balance is being able to safely stop a bicycle. Students will also learn the difference in how the rear and front brakes each stop the bicycle by practicing braking in a controlled environment.
Volunteer Connector
Have a volunteer share their experience with learning to ride a bike as a child OR about learning to ride a specific discipline of cycling later in life (mountain biking, road cycling).
Ask students what being in control of the bicycle looks like.
Example answers:
- Not skidding or locking up the brakes
- Paying attention
- Both feet on the pedals
- Both hands on the grips
If a projector or smart board is available, show a clip of supplied video of advanced cycling and racing.
Preparation
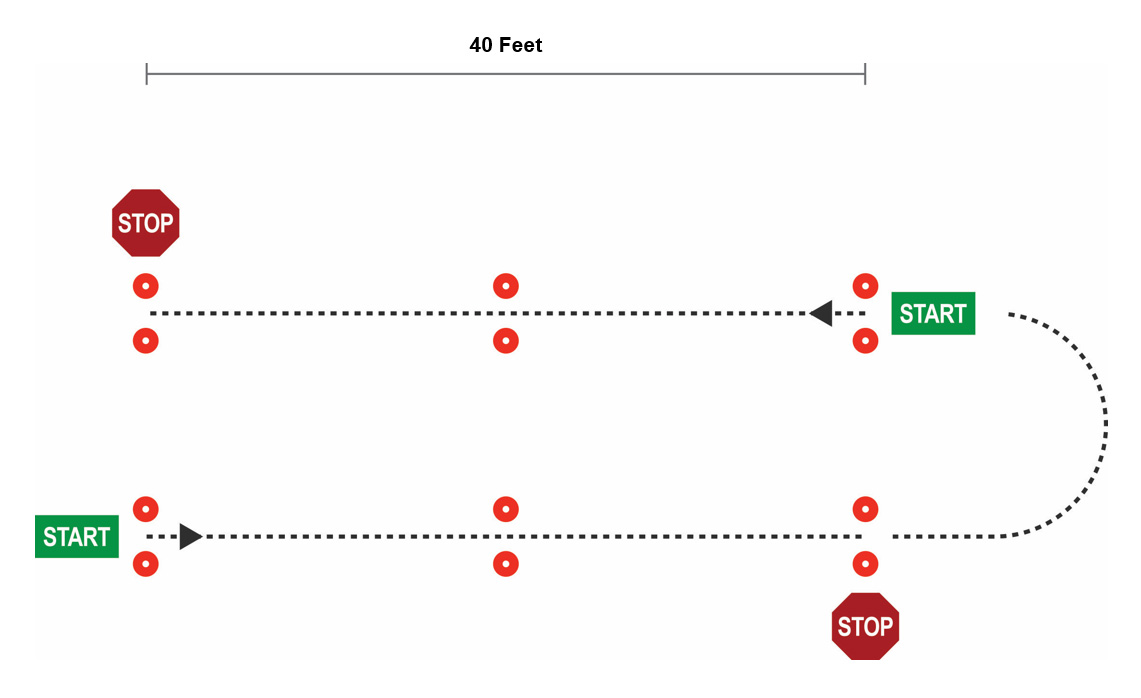
- Set up two “chutes” using cones, to indicate where the student will perform the skill and the volunteers will conduct support and assessment. These areas should also serve as teaching stations in which the skill will be demonstrated for the cyclists, and where cyclists will return when instructed.
- If bicycles have both front and rear brakes: use a piece of green or blue tape on right/rear brake to designate this as their primary brake.
Equipment
- Cones
- Stop and Go Signs
Power Start
Instructions
Explain and demonstrate the position and drill to reinforce the following points.
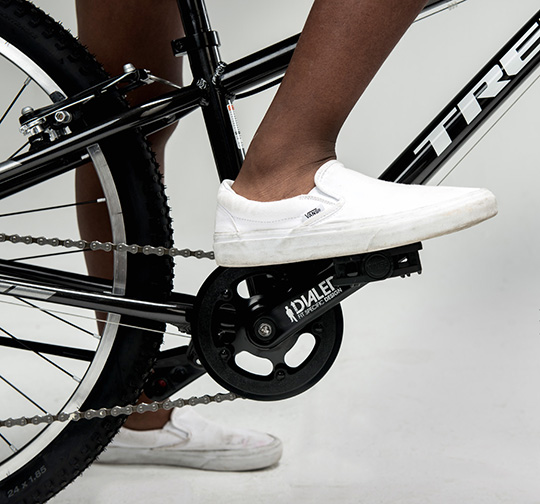
- Straddle the bicycle and place one foot flat on the ground at least a foot from centerline of the bicycle to form a stable foundation. Place the other foot on the pedal just forward of the "12 o'clock position" - on most bicycles this should put the crank arm aligned with the downtube of the bicycle. The rider may sit or stand to perform this drill, whichever feels more stable.
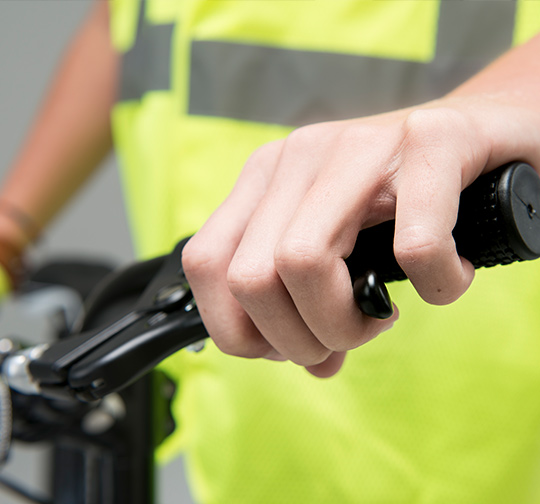
- Using right hand, squeeze right/rear brake lever to keep bicycle from rolling forward.
- On volunteer's command, have rider:
- Release brake
- Push down on pedal
- Push off ground with other foot
- Begin pedaling with both feet
Tip: Consider using the command "1,2,3 EXPLODE!" to signal the student to begin.
Controlled Stop
Instructions
Explain and demonstrate the position and drill to reinforce the following points.
- Brakes should be "covered" at all times (1 or 2 fingers resting on the brake levers while riding).
- Students should use both brakes for a controlled stop with 80% of force to rear brake and 20% to front brake.
- As the bicycle comes to a complete stop, turn handlebars slightly away from foot that will be placed on the ground.
- The cyclist should reposition the pedal to the Power Position as soon as possible to pedal out of Stop Box.
Instruct students to ride their bicycles on the designated course and demonstrate the Power Start and Controlled Stop/Braking skills in the Stop Box.
Tip: Instructors should use a Go sign and only let students begin when they are displaying a Power Start position.
Volunteer Connector Summary
Team Builder — Use answers to prompt discussion and review. Have cyclists share their responses out-loud.
- Why does it matter to use a Power Start?
- Which brake controls which wheel? (left = front, right = rear)
- What might happen if you pull the front brake lever too hard? (an "endo" or crash)
- What might happen if you pull the rear brake lever too hard? (a skid)
- Why should braking happen in a controlled manner?
Ask students to volunteer a way that they want to improve their riding next time.
Related Resources
- Bike Club Reads - Lesson 3
- Day 5 Virtual Script - Power Start & Controlled Stop
- Videos: Danny MacAskill's Gymnasium and Imaginate
- Video: Tip: Setting Up Safe Turns