LESSON 6
Scanning & Hand Signals
Goals
- Student is able to scan behind both the left and right shoulder while maintaining a straight line of travel.
- Student is able to perform left and right turn and stop (or slowing) signals while riding.
Overview
This lesson teaches students how to properly alert motorists and other cyclists of their intentions while riding — having the ability to perform this key skill will greatly improve safety.
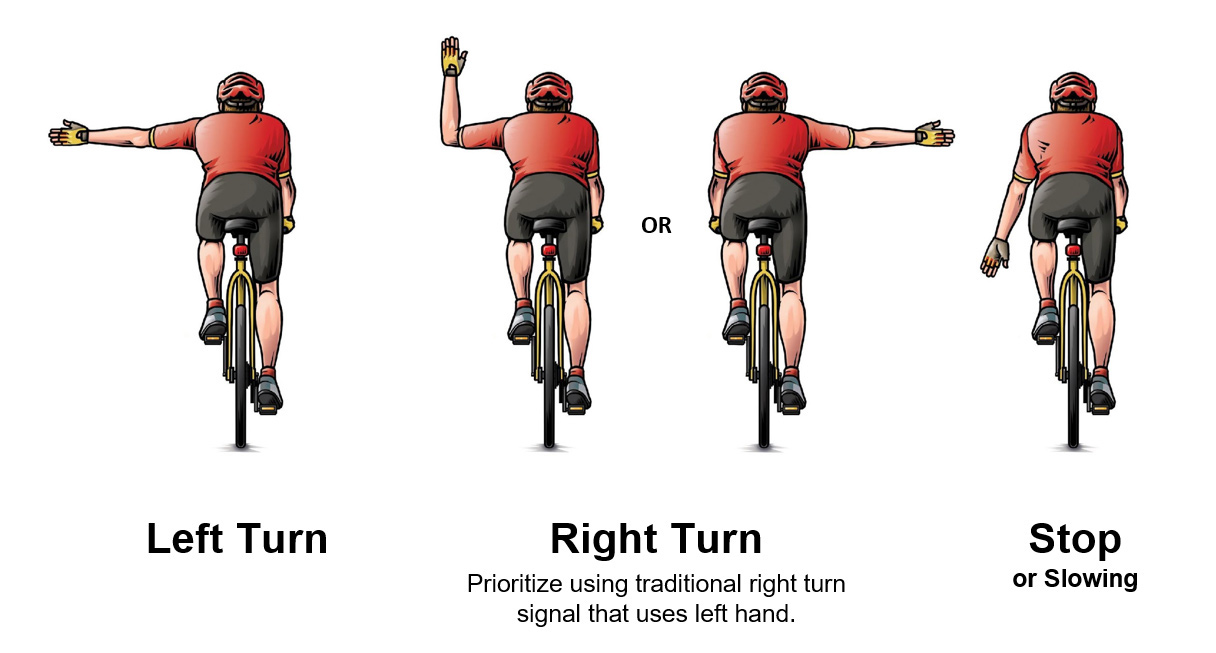
Students will learn the following signals: left turn, right turn and stop (or slowing). They also will practice their ability to scan behind their left or right shoulder while maintaining a straight line of travel. Scanning implies a very quick movement since the bike tends to go where we look.
NOTE: To reinforce each hand signal and to work on verbal communication skills, have students loudly announce which signal they’re performing while on the course. Some students may not be comfortable taking a hand off the handlebars. While this is perfectly fine, these students should still use verbal signals and work toward signaling with their hands as their balance and confidence improves.
Volunteer Connector
Remind students that not only do they need to be mindful of motorists and road hazards, crashes are often caused by cyclists swerving into other cyclists.
Have a volunteer perform a simple demonstration — pretend you are gripping your handlebars and riding, now look over your left or right shoulder while describing how this movement creates a natural tendency to veer (or pull) in the direction you're looking.
Share an example from a race or large group ride where inches, not feet, separated riders — and how important it is to hold your line while consistently surveying your surroundings.
Allow a few student questions following volunteer sharing.
Preparation
- Set up oval course with a volunteer positioned 10 feet from the start box (see diagram).
- Volunteer will be positioned to the left or right of students depending on direction of scan and turn.
- Also position volunteers at the start of each line to control when riders leave and evaluate students and coach if they veer off course when signaling.
Equipment
- Cones
- Stop Sign
Scan, Signal, Scan Drill
Instructions
- Position a volunteer 10 feet to the left or right (depending on direction of drill) at the start line of drill. Volunteer shouts SCAN at designated spot and holds up either one or both arms and have students announce "1" or "2".
- Volunteer then shouts SIGNAL and student should signal appropriate turn signal.
- Volunteer shouts SCAN again to simulate checking for cars before making a turn.
- Also position volunteers at the start of each line to control when riders leave and evaluate students and coach if they veer off course when signaling.
- After several laps of the course, switch directions and position of volunteer for scan drill.
Volunteer Connector Summary
Team Builder — Use answers to prompt discussion and review. Have cyclists share their responses out-loud.
Select a student(s) to stand in front of the group and perform hand signals while the group announces each one.
Then, ask these questions:
- Why is it important to signal while riding your bicycle?
- Why is it important to always scan before you make a maneuver or turn?
- When riding with a group, especially if you are near the front, why is it important to let others know if you intend to slow or stop?
- If you scan and see a motorist or another cyclist approaching and are unsure you can complete a turn in their direction in time (before they pass), what should you do?
- Why is it important to hold a straight line when scanning?